
Making a second cape instead of a mock-up!
When I was first working on my Fearne cosplay, I used a bunch of faux suede to mock up her large flowy cape. Faux suede sounds like a rather silly mock-up material, however I had gotten a large amount of it from an estate sale for free, and I didn't think I could mess this cape up too much, so I figured I'd just get a second cape out of it. It's my Practice Cape!

For reference, here is my Fearne cape folded in half and laid out on my dance studio floor… It’s a lot of fabric.
I wanted this cape to be very full and fall in ripples behind me. To achieve this I went with making a full circle cape. While thinking about how I wanted it to look I determined that I did not like the idea of having a seam down the middle of the back of the cape. So I cut out two 1/4 circle panels and one 1/2 circle panel. The half circle panel would be in the middle, with the 1/4 circle panels on either side of it. I pinned two of the seams together and tried to sew through it… my machine did not want to do this. I tried a different needle and still had issues. The fabric was heavy and hard to sew through, so I set it aside for a while.
Fast forward 1 year.
I ended up getting a new sewing machine and eventually remembered that this cape project existed! However… I couldn't figure out what I wanted to do for the hood and set it aside for yet another year.
Fast forward 1 more year.
Finally I felt inspired to work on this project and picked it up again.


I really wanted a swooshy cape with a big hood for ren fest and this one was already started. I did test a piece of scrap fabric on my new machine before moving forward with it and my new machine had absolutely no issues sewing through the faux suede. After hemming and hawing over what to do about the hood, and failing to find the original hood pattern I was thinking of, I decided to make it a 2 piece robe. The long cape part and a hooded cowl-like capelet I could wear over the top or on its own. I again searched for a hood pattern I liked and finally settled on a DIY pointed hood pattern I found on pinterest (link here). I used the photo of the hood to make the pattern myself because I wanted to make a few modifications to the size of the hood (aka make it bigger). For the capelet I was inspired by a few photos on pinterest. I ended up making my own pattern for this so that I could use the fabric scraps of the large cape panels I had cut out 2 years prior. It took a few re-draws and a little trimming to get right, but I managed to get it to a good shape in the end.


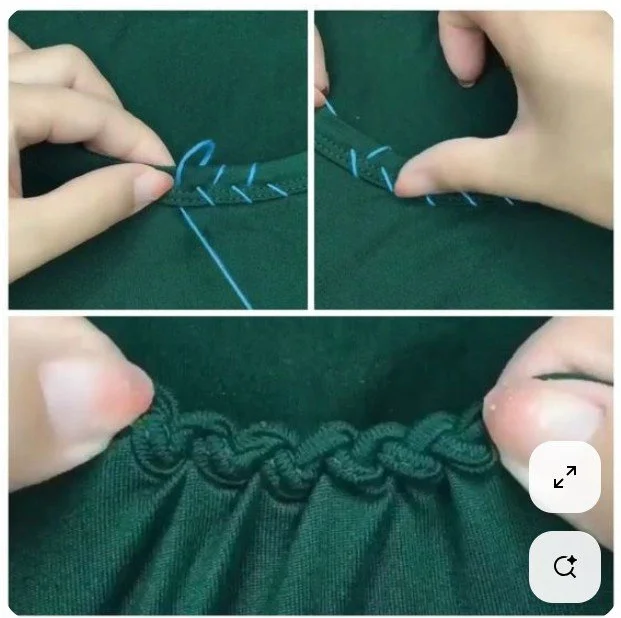
I went back to the main cape to add some finishing touches to it. I wanted it to look nice on its own or with the capelet. The neckline on the original cape had stretched pretty horribly, and barely sat on my shoulders (#bias problems) I used a cute embroidery technique around the neckline to make it look finished and reduce the circumference. I also made a long strap to used to tie the cape on my body. Because it's so heavy I did not want to tie it around my neck, so this tie is designed to go across my chest or under my arms and around my back. This reduces a lot of the strain of wearing a cape this heavy. I also attached a couple of buttons to either side of the cape neckline. These buttons both look cute and are how I planned to attach the capelet to the cape.


Moving back to the capelet, I sewed the hood together and attached it to the capelet. I left some longer tabs on the hood near the neckline, and hand sewed a couple of button holes into each one. It could now be attached to the larger cape and was renfest ready!

The first ren fest I wore it to was an unfortunately warm day at Minnesota Ren Fest. I kept it on the full day, but mostly flung as much material over my shoulders as I could. I did take a little time to do a spin test and confirm it had adequate swoosh! The second ren fest was a much more successful test of the cape! I was a very chilly day at the Michigan Ren Fest and this cloak kept me quiet warm and did a decent job of keeping the wind out. However that swoosh does work against me when the wind catches the edges just right. Still worth it!
There are a couple of things I would like to change on the large cloak, I never trimmed the edges of the bottom on the cloak, so it is an uneven bias mess that needs to be trimmed. Especially the front two corners. They are caked in mud… BUT they are caked in such a perfectly symmetrical way, I might just use the mud as a guide for trimming them down…
The capelet is perfect and works excellently as its own separate garment. Perhaps I will eventually add more details to both parts of the cape, but for now I am very happy with how this project turned out!
